iPadOS 13 – Mini Floating Keyboard and QuickPath Swiping Features on the iPad Mini 5

Introduction

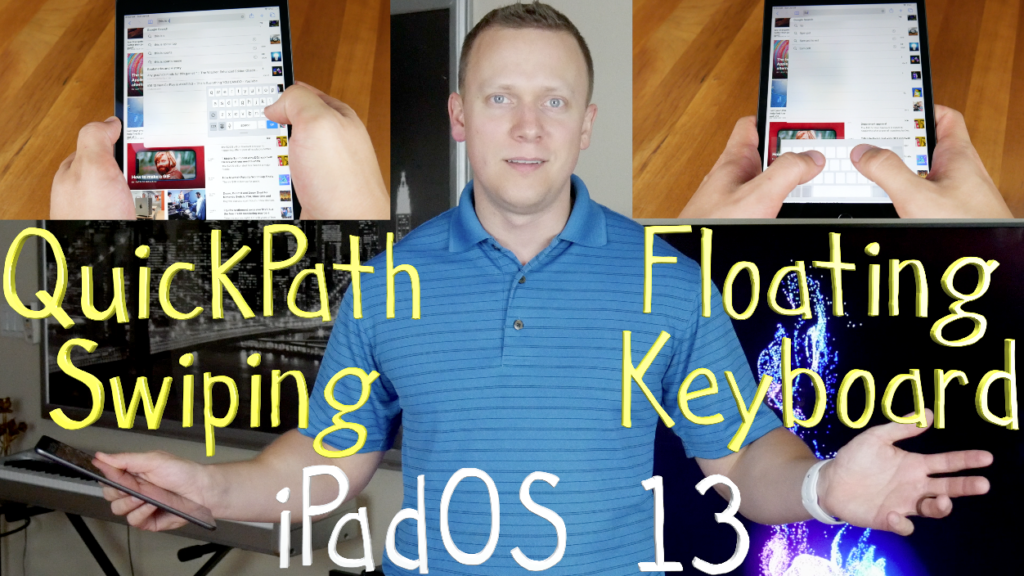
Apple released the public beta for iPadOS 13 that shows some new exciting features for the iPad. It introduces a new Home screen, new multitasking options, new Apple Pencil options, support for external drives, and more. I want to talk about the new features that excite me the most – the new Floating Keyboard and Swiping features.

Background

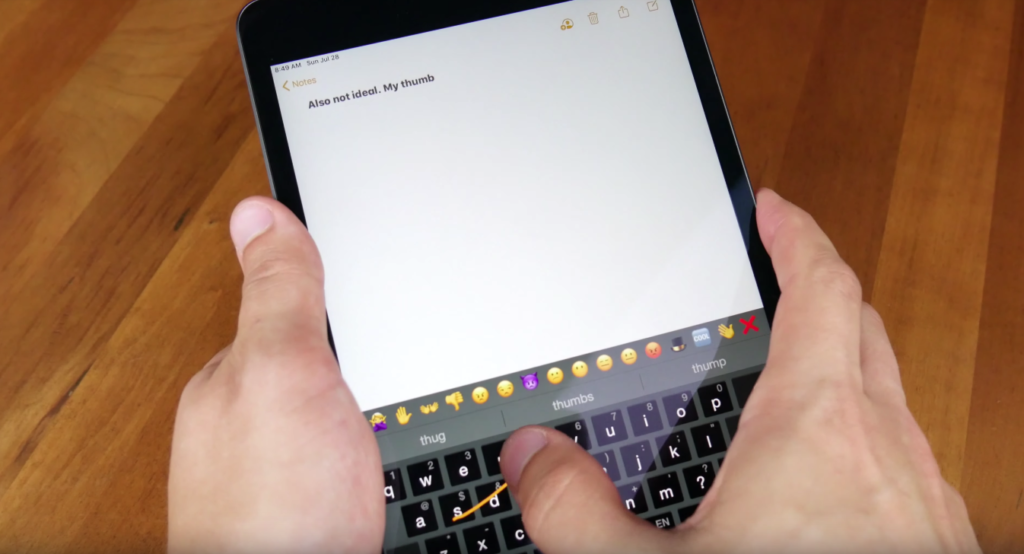
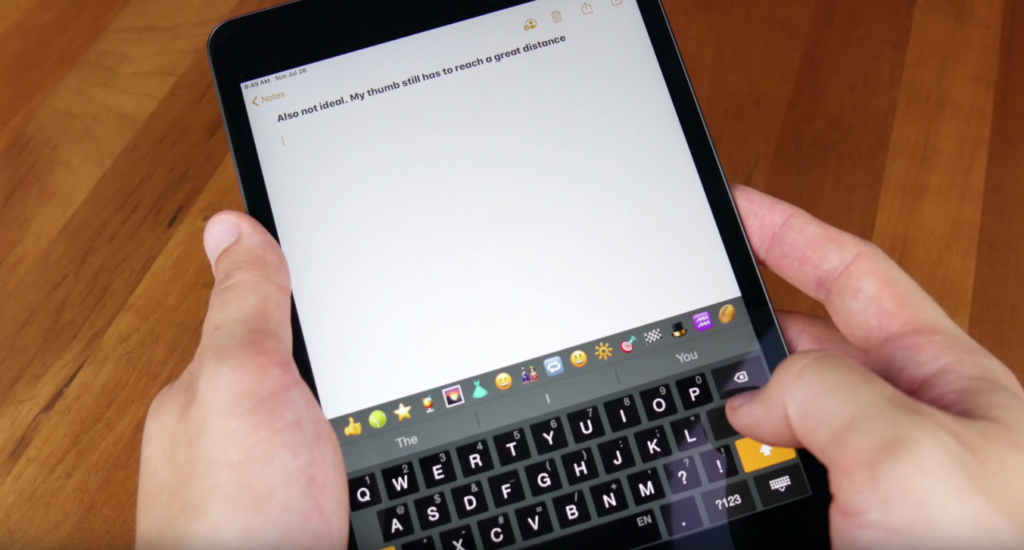
For me, I never found the iPad very ergonomic. I want to be able to easily reach the entire screen with my thumbs without having to reposition my hands. With the larger iPads, in order to select something in the middle of the screen, I would have to hold the iPad with one hand, let go of the iPad and press the icon with the other hand. Although it sounds simple enough, wrist and hand fatigue is worse over time when you do this. The iPad Mini mostly solves this issue. I just have to slide my hand up and down the side of the tablet if I want to select something at the top and then bottom of the screen. My thumbs can essentially reach the entire screen. Hand and wrist fatigue is significantly reduced. All this said, typing on the iPad has always been slightly more fatiguing. In landscape mode, I have to again let go of the tablet with one hand and peck at the screen with your other hand. In portrait mode, I can reach all keys with my thumbs without letting go of the tablet, but it still isn’t perfect; it’s missing something. Additionally, I am a SWYPE user on my iPhone. Swyping is a much faster way for me to type than pecking the on-screen keyboard with my thumbs or fingers. If I want to use SWYPE, SwiftKey, or Gboard on the iPAD, I have to hold the tablet with one hand and swype with the other. I’ve looked for a long time for an ability to resize any of the 3rd party keyboards that include swype capabilities, but I couldn’t find anything. If such a function existed, I could swype easily with one thumb without ever having to let go of the tablet. This would significantly reduce fatigue during usage. That brings me to iPadOS 13. In the beta, Apple introduced two things that get me really excited: Resizing and Swiping capabilities to their default keyboard!!

Floating Keyboard – Resizing Feature

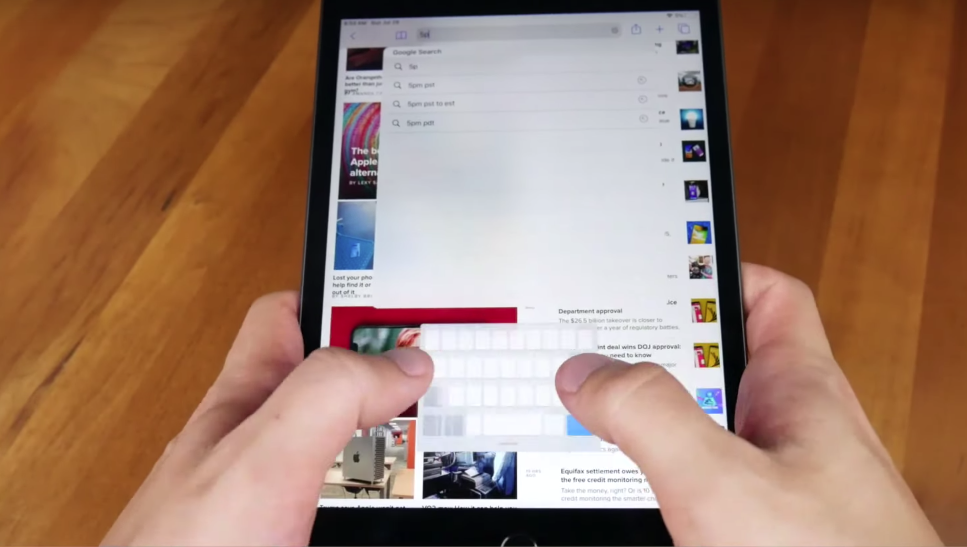
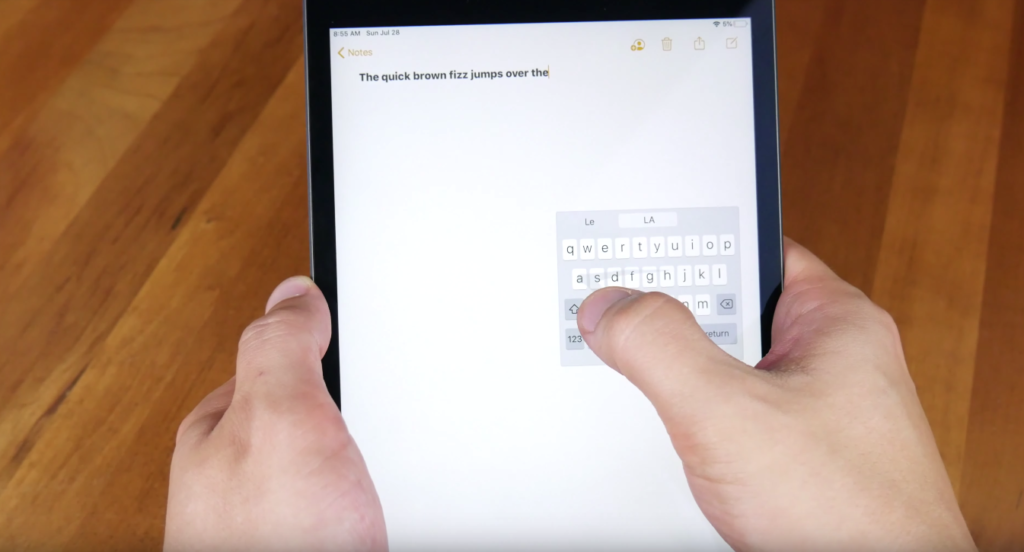
First, let’s talk about the resizing capability. Apple introduced a Floating Keyboard. I simply pinch the default keyboard with two fingers and the keyboard will shrink in size. The keyboard then floats on top of the screen you are working on. Although the floating keyboard can potentially block important content, it can easily be repositioned around the screen by dragging the bottom of the keyboard. I personally prefer to move the keyboard to the middle right side of the iPad, a location that lets me hold the iPad comfortably while still interacting with the keyboard with my right thumb.

QuickPath – Swiping Feature

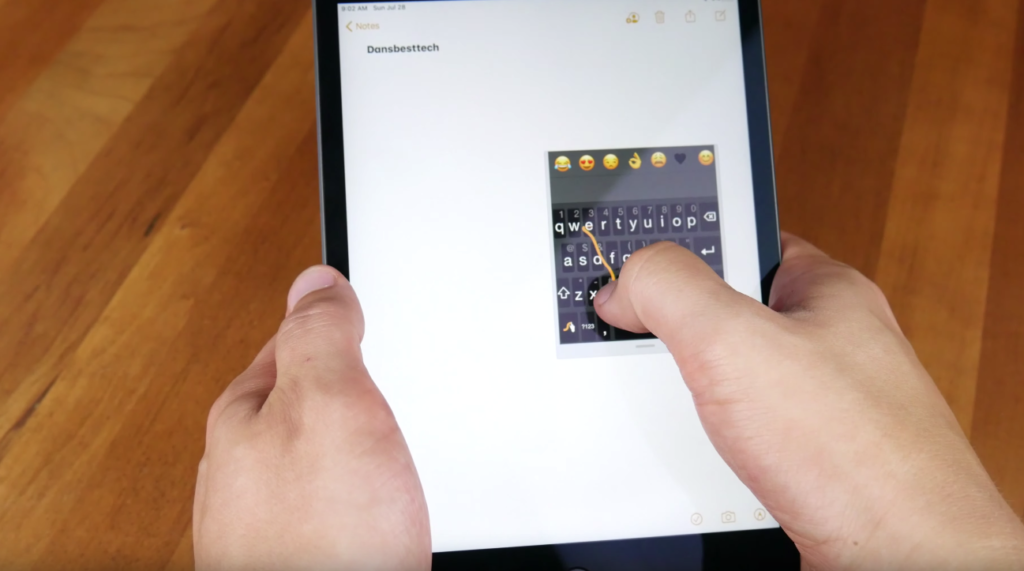
That brings me to the second new feature I really like – QuickPath. QuickPath for the keyboard enables swiping on Apple’s default keyboard. FINALLY!!!!!! As I said before, although many third party keyboards on the iPad include swype capabilities, none of them could be resized on the iPad to work with just a single thumb. Therefore, you had to swipe your finger across a large keyboard, which isn’t very ergonomic to me. Now, QuickPath (which again is what Apple is calling their swiping feature) can be used in conjunction with the floating keyboard. I can now easily swipe on the iPad with just a thumb very ergonomically without ever letting go of the tablet. Of course not everything is perfect in the Beta. QuickPath doesn’t register words as well as Swype, Swiftkey or Gboard. Luckily, alternate words show at the top of the keyboard in the predictive bar, so you can choose any of these words if the software wasn’t correct in choosing what you swiped. Another issue I found in the beta was that alternate words currently do not show when typing in the URL bar; this is where I do most of my typing when browsing the internet. So how well does the Quickpath swiping functionality work in the Public Beta? Quickpath needs some work, but again, this is a Beta!! All this said, you don’t HAVE to swipe, you can still tap each individual virtual key interchangeably with swiping. This is convenient when you know the word isn’t in Apple’s dictionary. Currently, I don’t think there is an option to add custom words like your last name to the dictionary, but Apple has to start somewhere!

Third Party Keyboard Support in Float

So can you use third-party keyboards in a reduced size? The answer is YES!!! After I pinched Apple’s default keyboard into the smaller float keyboard, I tried switching the keyboard to Swype… and it worked! This is very exciting, because there are many functionalities in these third-party keyboards that currently don’t exist in Apple’s keyboard. For example, pressing and holding certain keys will allow you quick access to symbols like the question mark. Also, these third party keyboards have been around longer, so their algorithms for word detection are a little better. And finally, you can add custom words (like names or brands) to these keyboards easily. Being able to swipe something like my last name is a Must for me.

Conclusion

In conclusion, iPadOS 13’s Quickpath swiping capabilities on the new smaller floating keyboard brings something new and exciting to the iPad – especially the latest iPad Mini 5. I think the combination of these two features will decrease fatigue and improve the overall ergonomics of the iPad Mini 5, and I am very excited to see what these features look like when the full version of iPadOS 13 is released in September. Let me know in the comments down below: What is the most ergonomic way you use your iPad? Are you looking forward to iPadOS’ floating keyboard and swiping capabilities? What excites you most about iPadOS?

Continue Reading

Oculus Quest – Two Month Review

Introduction

A few weeks ago, I had my 30th birthday, the same day the Oculus Quest was released, and my beautiful wife bought it for me. This is my two month review of the best Standalone VR Headset ever released. No tethering to a high-end PC is required for you to enjoy VR gaming, but is it worth the sacrifices? Let’s find out!

Cost

The cost for the VR Headset is either $400 for the 64GB version or $500 for the 128GB version. These prices get you controllers and a charging cable, everything you need to start gaming in VR. Current games aren’t that large at around one to two Gigabytes, so I recommend saving $100 and sticking with the 64GB version for $400. Compared to the Oculus Rift’s launch price of $600 plus $200 extra for controllers and the $800 launch price for the HTC Vive, $400 doesn’t seem so bad.

Requirements

Unlike the Oculus Rift and HTC Vive, you don’t need to plug the headset into a high end gaming PC. That’s right. No expensive computer is required if you aren’t a PC gamer; No cable is required for you to trip on, and no Windows operating system is required if you prefer to use other operating systems on your computer like Mac or Ubuntu.

Hardware

Regarding the hardware and as I said before, both the 64GB or 128GB storage options for the Oculus Quest are enough space for games in my opinion. It is powered by 4GB of RAM, and the two-year-old Snapdragon 835 mobile processor. Each OLED lens produces 1,440 by 1,600 resolution at 72 Hz refresh rate. The headset offers six degrees of freedom using inside-out tracking from four sensors on the headset itself. The headset comes with a power button, a volume rocker, an interpupilary distance (IPD) slider, and a USB-C port for charging. The IPD slider can adjust from 58 to 72mm. The quest feels premium with fabric accents. It weighs 571 grams vs the 470 grams from the Oculus Rift, and it’s battery lasts 2 to 3 hours on a charge. The controllers track great! They not only tracks your hands like on the HTV Vive and Playstation Move controllers, but they track your fingers as well. It even has capacitive buttons.

Tracking

For the most part, the inside-out tracking is perfect. It is way better than the PSVR, which required me to sit a certain distance from the camera. It doesn’t require any lightboxes or sensors that you have to plug into an outlet or your computer like on the HTC Vive and Oculus Rift. It just works! That said, if the sun is shining brightly into a section of the room, the tracking will become jerky and you might lose tracking. It’s probably a good idea to close the blinds before playing.

Portability

The Quest is in my opinion the best thing to happen to VR gaming since the Oculus Rift and HTC Vive were released. This is because of portability. One can’t simply watch an ad to experience what VR is, you have to put the headset on and try it first hand to know what it is. That’s hard to do when the headset is hooked up to a computer or PS4. The Quest is increasingly an attractive option because you can bring it anyyyywhere and show it to anyone. Instead of being confined to wherever you have your Vive set up, you can bring the Quest into a living room, the bedroom, another home, the office, or anywhere else. This portability should increase the adoption and success of VR, and the more successful VR is, the more developers will make high quality games for it.

Games

Speaking of games, the Oculus Quest launched with more than 50 titles, but the number of games still feels lacking right now when compared to SteamVR and PSVR; that said, that’s how I feel when any new gaming system launches.

One game I found really fun was Vader Immortal. It’s not just a great VR game, and it’s not just a great Star Wars game. It is a great game! I felt like I was experiencing this world. I could almost smell the smoke when seeing Darth Vader for the first time. I couldn’t believe how close they got the voice to sound just like James Earl Jones; very high quality and very well done. The lightsaber battles were fun and challenging. There was just the right amount of it too, as it didn’t get repetitive. My only complaint is that many VR games right now are asking players to turn dials, push buttons, etc. That is starting to feel repetitive, even in Vader Immortal.

Another great game on the Oculus Quest is Beat Saber, and it is just as epic as usual. This game is like Guitar Hero and Rockband in VR, but instead of guitars, it has light sabers! It has you slicing through blocks to music. After playing custom songs on the HTC Vive, playing the limited number of stock songs on the Oculus Quest felt a little lacking. Luckily, many modding apps are making it easier each day to add new custom songs to Beat Saber on the Oculus Quest. There are various apps to do this, like SideQuest and Oculus Quest Beat Saber Song Installer. Although there are many tutorials available currently for how to do this, I, myself, am going to wait until custom songs are integrated into the official build of Beat Saber.

Anyways, I just wish I had a larger room to take full advantage of room scale. Room scale allows for rooms up to 25ft by 25 ft. That is insanely awesome! I don’t even have enough space for the recommended 6.5ft by 6.5ft. Luckily, you can still play games inside your barrier; it will even warn you when you get close to the edge. That way, you won’t punch a wall. Now if only they could prevent me from stepping on the dog.

Specs / Good Enough?

So are the Specs good enough? To me, I care about:

  • Screen-Door-Effect
  • Aliasing / Text Readability
  • God-Rays
  • The quality of the games

Screen Door Effect, or SDE, is the effect of your eyes being so close to the pixels on the display that you can see the gap between each pixel. As a result, the image looks like you looking through a screen door. One way to counter this is to increase the resolution of the display. The Oculus Quest has a higher resolution of 1440X1600 per eye than the Oculus Rift and HTC Vive. Therefore, SDE is reduced. That said, resolution isn’t everything. The Playstation VR headset’s lower 960X1080 resolution per eye provides the best or least SDE. This is because Sony increased the subpixel count for each pixel in their RGB display. The increased subpixel count helps each pixel blend together better reducing the screen door effect. All this said, the Oculus Quest’s SDE is better than the Oculus Riftand HTC Vive but not as good as the PSVR headset.

Aliasing, Anti-aliasing, and text-readability all have to do with the graphical power and game design. Playing VR games using the graphical power of a PC will obviously have more anti-alliasing than that of a mobile phone processor. Therefore, in theory, text and lines in games will not be as clear on the Oculus Quest. That said, when the HTC Vive and Oculus Rift were first released for the PC, many games used small text that was barely readable. Since then, game developers have increased text size in VR games, making the text much easier to read. So the text readability on the Oculus Quest is perfectly fine. As far as aliasing and jaggies on the Oculus Quest, they are worse than the HTC Vive and Oculus Rift, but you won’t notice them unless you do a side-by-side comparison. Games can also be supersampled on the HTC Vive and Oculus Quest to sharpen text and remove jaggies even further; some say supersampling even helps hide some of the screen door effect. The Quest doesn’t have enough power to supersample.

God-rays are like blurry lens flares when bright objects are juxtaposed against dark backgrounds. They were really bad on the Oculus Rift. They were reason why I sold my Oculus Rift. I couldn’t stand them. They are still present on the Oculus Quest, but they are not nearly as distracting like they were on the Oculus Rift. I’d say they are comparable to the God-Rays on the HTC Vive and PSVR.

That leads me to game-quality – The game quality in the Oculus Quest is top notch. I think Oculus ported over only the very best VR games that existed on PC. Therefore, if Oculus had to sacrifice some graphical power in order to make the VR experience portable and more convenient, then it is just fine to me as long as the games are fun. And there is a huge benefit to an almost instant access to games without having to plug everything into the computer, and launching the game from the computer. The Oculus Quest is a much more user-friendly VR experience than anything I’ve used before. Take the PSVR for instance. My PS4 sits on my tv unit on the other side of the living room from my couch, and the cable that connected the headset didn’t reach far enough. So I had to move the PS4 to the coffee table in the center of the living room. And then I realized that the PS4 camera required me to sit closer too. So I had to move the PS4 camera to the Coffee Table too. My wife was not happy. Long story short, I returned the PSVR.

ALVR and VRidge

What if Oculus Quest doesn’t have the game I want to play? What if I am not happy with the graphics quality on Oculus Quest? ALVR and VRidge give you the ability to play Steam VR and Rift games wirelessly through your computer!!! Of course, this requires you to have a high-end gaming pc with a high-end graphics card and a very fast 5GHz reliable Wifi connection. The good news is that Vridge when used with the Oculus Quest supports 6 degrees of freedom! Woop! The bad news is that you will get the occasional screen freeze or streaming artifact. There are some compatibility hiccups too. Therefore, the experience won’t be perfect, but for some exclusives, it might be worth it.

Conclusion

In conclusion, Should you buy the Oculus Quest? If you want a VR Headset that is stand-alone with no gaming PC required, has only the highest quality of games, doesn’t have cables around you for you to trip on, and is a lower price than the HTC Vive Pro, than the Oculus Quest is for you. That said, the cost might still be prohibitive for your budget, the games are a limited at this time, graphics aren’t as good as those from a Gaming PC, the Screen Door Effect and God Rays are still present, and previously purchased games from Steam VR will need to be repurchased. Will you purchase the Oculus Quest, or will you wait for another headset down the road?

Continue Reading

The Best Signal from the N64? – N64RGB + RetroTINK 2X Smoothing

Introduction

A few months ago, I wanted to try and get one of the best signals from my N64. Rather than purchasing the UltrHDMI, I purchased the Tim Worthington N64RGB with Deblur Mod Kit. After many hours of install, I finally got it working. The Tim Worthington N64RGB with Borti4938’s Deblur Mod Kit produces a clean RGB analog signal from the N64. This is the best option for users who want RGB rather than HDMI. That is when I heard about the RetroTINK 2X. The RetroTINK 2X is a zero lag converter that converts Composite, S-Video, and YPbPr signals to HDMI. It can be used with almost any retro console. Reviewers have said many great things about the RetroTink 2X when using the N64’s native S-Video and Composite output, but now let’s check out the N64 when using the much cleaner HD signal from the N64. In this video, I am showing you the RetroTink 2X’s smoothed vs unsmoothed settings.

Games and Examples

I tested Zelda (Ocarina of time), Zelda (Majora’s Mask), Star Fox, Double-O Seven (Golden Eye), and Super Smash Brothers. In Zelda, Majoras Mask, the textures on the ground are smoothed, aliased edges on mailboxes and stairs are smoothed, Link himself is smoothed, and 2D objects like the on-screen display and menu screen are smoothed as well. In Zelda (Ocarina of time), you can see how the low resolution railing jaggies are smoothed when the filter is applied. In Super Smash Bros, the edge of the top surface of the building is smoothed, both link and kirby are smoothed, and even small items like link’s sward look much better to me. By the way, I recommend you view this footage on a tv or monitor. I don’t think you’ll see much difference on a phone or tablet. In star fox, you can see a big difference even in the main menu; focus on Fox’s ears. During game-play, you can see the best improvements in the Airwing’s wings. Finally, in 007, Golden Eye, you can see the difference in the gun you are holding as well as the objects on the ground in front of you. The bridge looks way improved in my opinion.

The Setup

Let’s talk about the Setup. The N64RGB mod gives a clean RGB analog signal from the N64. The install is difficult, but install services are available. The firmware from Borti4938 introduces a de-blur functionality. I highly recommend this firmware, as it removes the horizontal blur from the N64 signal. The next item in the line is the Shinybow SCART to HDTV Converter. This converts the RGB signal into YPbPr component signals. It is a fully analog converter which is said to have zero latency. Now we can use our N64 on American TVs. The last item in the chain is the RetroTINK 2X, which converts the YPbPr component signal to HDMI. The good news is that it is plug and play and can be used with almost any retro console. As I said before, reviewers have said many great things about the RetroTink 2X when using the N64’s native S-Video and Composite output, but I really care about using it to convert HD N64 signal to HDMI, and then filtering it. The settings I use with the N64 is the Line-Doubling mode that outputs 480P over HDMI to the TV. Regrettably, there are some key shortcomings of the Retrotink 2X, though. There is some distortion during loud, low frequency sounds and the filter between the different inputs of the RetroTink 2X is lacking. For example, my NES plugged into the Composite input of the Retrotink 2X would cause static in the N64 signal plugged into the component input, even when the NES was turned off.

Worth it?

Is this setup worth it? If you want the best picture (in my opinion) when playing N64 games on original hardware and on an HDTV, I think so. The picture is sharp at 480p, the lag is nonexistent, and to me, the filter feature creates one of the cleanest signals generated from the original N64 hardware. Just remember, there exists a sound glitch, there is a problem with multiple inputs, and the picture will never be as good as it would on an emulator. Would you purchase the RetroTink 2X to get HDMI from the N64? What do you think about the filtered look of N64 games?

Continue Reading

Game Boy Micro – Worth it in 2019?

Intro:
In 2005, Nintendo released the Game Boy Micro. Unlike the Game Boy Advance and Game Boy Advance SP, the Game Boy Micro lacked backwards compatibility for Game Boy and Game Boy Color Games. As a result, the Game Boy Micro was not very popular. Is it worth it to buy a Game Boy Micro in 2019? What if there was a way to play Game Boy and Game Boy Color games on the Game Boy Micro? Is it worth it then?

Cost:
Let’s first talk about the cost. Due to its rarity and age, the Game Boy Micro is currently available new and used on Amazon for $449 and $125 respectively. That’s pretty expensive considering it’s launch price was only $99. The funny thing is $99 in 2005 is now $128 after adjusting for inflation.

https://amzn.to/2MaexHc

Games on the other hand are relatively cheap. Approximately $10 to $35 for very good condition used games. See the link in the description below:

https://amzn.to/2sv3Plz

https://amzn.to/2ALQyJE

https://amzn.to/2ANFFXS

Overall Size:
The Game Boy Micro’s dimensions are 4″ in width, 2″ in height, and 0.7″ in thickness, and it only weighs 2.8 oz. So if you care for ergonomics, the Game Boy Micro will feel more cramped than the alternatives. That said, I don’t have very large hands, so it feels just fine to me.

Screen:
The screen is also very small at only 2.9 in. In my opinion, though, this screen is even better than the AGS-101 screen on the Game Boy Advance SP. Both of these screens are backlit, which makes colors pop similar to what we’ve grown accustom to on our smart devices, but the pixels per inch or PPI on the Game Boy Micro is higher than the Game Boy Advance SP due to the smaller screen. Everything looks super crisp and sharper on the Game Boy Micro’s smaller screen. As a result, the PPI increased from 99 to 144, creating the illusion that the games “look” higher resolution. The drawback is that text will also be smaller. The font size of Game Boy games has never been that small, though, like you see on games today, so I would say that text is still readable.

Faceplates:
The faceplates are replaceable if you’re into that sort of thing. I suppose it’s a good thing since the screen is exposed at all times unlike the Game Boy Advance SP screen. Multiple variants exist if you’re into that sort of thing. Removing the faceplate is very easy.

D-Pad:
The D-Pad feels mushy to me. Over the past few years, I have gotten used to the Xbox One tactile D-pad and the firm PS4 D-pad. That said, it only took me a few minutes to get used to the Game Boy Micro’s D-pad again. If you want a more tactile d-pad, I would recommend going with the Game Boy Advance SP AGS-101.

Shoulder Buttons:
The shoulder buttons feel great through! They are tactile, and you can hear them when you click them. My only complaint, though, is that you have to press the shoulder buttons near the center of the unit. This is opposite for how the original Game Boy Advance shoulder buttons are pressed. Those are activated when pressing near the sides of the unit. Due to its small size, the Game Boy Advance Micro also isn’t as ergonomic when using the shoulder buttons than the larger Game Boy Advances.

Battery:
Like the Game Boy Advance SP, the Game Boy Micro includes a built in rechargeable lithium ion battery. The battery lasts five to eight hours depending on the screen brightness. 

Headphone Jack:
I’m happy to say that the Game Boy Micro DOES include a headphone jack. Apple wasn’t the first company to get rid of it and then try to get you to buy their adapter. Nintendo got rid of the headphone jack on the Game Boy Advance SP and sold a proprietary adapter. Following the outrage, Nintendo reintroduced the headphone jack on the Game Boy Micro despite it’s size reduction, and then Nintendo included it on every handheld console since. So yes, it’s ridiculous that I even have to talk about the fact that the Game Boy Micro includes a headphone jack, but yes, the Game Boy Micro includes a headphone jack. Yay! That brings me to the one thing that Nintendo didn’t include in this version, compatibility with all Game Boy games.

Backwards Compatibility:
Regrettably, the Game Boy Micro is not compatible with Game Boy and Game Boy Color games. There currently exists only one workaround.
Goomba Color is a GBC emulator for the Game Boy Micro and Nintendo DS, which will require you to purchase a flashcart. It won’t play your physical cartridges through. Maybe a future update to Goomba Color will allow hot swapping between the Game Boy Advance  flash cart (which boots the emulator), and the physical copy of the Game Boy or Game Boy Color game that you want to play, but that may be wishful thinking for a 14 year old handheld. Let me know in the comments below If you’d be interested in seeing a tutorial for loading Game Boy Color roms onto the Game Boy Micro using Goomba Color.

Conclusion
In conclusion, if you want the best screen quality for GBA games, you want the highest pixels per inch or PPI, and you want a headphone jack when playing your GBA games, then the Game Boy Micro is for you.
Just remember, it is a little more expensive, it is a little less ergonomic, it has a mushy D-pad, and it lacks compatibility with physical GB and GBC cartridges.

Continue Reading

Macbook Pro (13-inch, Mid 2017) – Worth it in 2018?

Intro:
In 2017, Apple released the Macbook Pro 13. I decided to give the base 13-inch model, the Core i5 version with 8GB of RAM a try. Is it worth it in 2018?

Configuration Options:
As an average Joe, who doesn’t want to break the bank, I am reviewing the base model, the absolute cheapest model you can purchase. Luckily, in 2017, the base model did not include the touchbar which causes the price to jump to $1800 before tax. The issue: only a dual-core CPU, but this might not be a bad thing depending on your tasks at hand (GPU and battery-life). This configuration comes with two Thunderbolt 3 ports (unlike the 2018 version which comes with 4), a 2.3GHz dual-core 7th-generation Intel Core i5 processor, 8GB of 2133MHz DDR3 RAM, and the integrated Intel Iris Plus Graphics 640. For this base model, you’ll still be paying $1300 before tax at Apple, but Best Buy has this version on sale for $1150. This is significantly cheaper than the 2018 cheapest version at $1800. Upgrading the storage at Best Buy to 256 GB bumps the price up $150 to $1300. At Apple, you get more options. Upgrading the CPU to the 2.5Ghz dual-core Core i7 increases the price $300. Increasing the RAM to 16GB increases the price $200. Increasing the storage to 256GB increases the price $200, 512GB increases the price $400, and 1TB increases the price $800.

Keyboard:
This keyboard is Apple’ 2nd Generation butterfly keyboard. It has only 0.8mm of travel. I struggled for a year to get used to the these keys on the 2016 Macbook, but I am here trying it again. You’ll either love them or hate them. I prefer the key travel on the Macbook Air 2015 and 2017, which has 1.4mm of travel. The keys are backlit with the ability to adjust the brightness. They also include an ambient light sensor. How do these keys compare to the 2018 3rd Generation Butterfly keys? The 2017 2nd Generation butterfly keys are a little more tactile and require a little more force to activate. They also don’t have the silicone barrier underneath each key, which is supposed to fix the problem Apple has been having with the 1st and 2nd generation butterfly keys. Apparently, dust and crumbs have been getting stuck under these minimal low-profile keys preventing the keys from registering a click. Apple has been servicing the affected keyboards free of charge though. These 2nd generation butterfly keys are also very clacky. The silicon barrier in the 2018 3rd generation butterfly keys are quieter due to the silicone barrier. The 2015 and 2017 Macbook air keys are much preferred when trying to type in a quiet classroom or office.

Glass trackpad:
This large trackpad is just as nice as all Apple’s trackpads. The glass feels very nice under my fingers. The force touch trackpad works perfectly. Apple has nailed the simulated click; you can’t feel a difference in the physical click except that you can click anywhere on the trackpad now just as easily as you can click the bottom. It is way better than any Windows or Chrome OS computer. All this said, as I sit here typing, within the past 20 minutes, my palm has activated the trackpad, and moved my typing somewhere else on the screen. This has interrupted my workflow. I’m now focusing on not resting the inner side of my palms on the macbook to keep this issue from happening again. Is this something that happens to you?

Touchbar and Fingerprint Sensor:
In order to get the price down, I am reviewing the 2017 Macbook Pro without Touchbar. Right now, at Best Buy, you’ll have to spend an extra $550 to get the 2017 Macbook Pro with touchbar. You’ll also get 512 GB of storage, though. At Apple, you’ll have to buy the 2018 Macbook Pro for $1800 or $500 more if you want the touchbar. This version only gets you 256GB of storage, but you get the new 8th Gen Quad-core CPUs and 4 thunderbolt 3 ports.To me, I like my muscle memory telling me exactly where each key is without me having to look at the keyboard. I also like bringing the cost down. One thing I like about the touchbar is the TouchID fingerprint sensor. Regretably, Apple does not currently sell a Macbook Pro without a touchbar but with a ToughID fingerprint sensor. The 2018 Macbook Air does include physical function keys and a TouchID fingerprint sensor, though, but the Macbook Air performance is significantly less.

Ports:
The 2017 13-inch Macbook Pro comes with only two Thunderbolt 3 ports, both of which are full speed (40 Gb/s); the 2017 13-inch Macbook Pro with touch bar has four Thunderbolt 3 ports, but two of the ports are throttled. Other than the Thunderbolt 3 ports, the only other port is the 3.5mm headphone jack. I will always miss having USB type A ports and an SD Card slot. Please comment if you still require these type of ports for your applications.

Sound:
The upward facing speakers sound great for such a thin laptop! The sound performs better than the 2017 Macbook Air and the 2018 Macbook Air. There includes a fuller sound. The 15 inch Macbook Pros have more base. For the best quality sound, use external speakers or headphones.

Size and Weight:
The screen is 13.3 inches diagonally. The screen uses Apples 16:10 aspect ratio, which in truth, is great for scrolling through webpages as you can see more from the top to the bottom. As far as weight, I can hold this laptop with one hand with no problems. The 3.02 Lb laptop easily fits inside a bag. It is just a hair heavier than the macbook air. It is 0.59″ thick. All this said, the size of the laptop is large enough to multitask, but small and light enough to be very portable.

Display:
The screen inside the macbook is a gorgeous 13.3-inch (diagonal) LED-backlit display with IPS technology. Resolution: 2560×1600 or 227 pixels per inch.

Battery Life:
The laptop includes a 54.5-watt-hour battery. The 2017 variant with touchbar includes a smaller 49.2 Wh battery, but the 2018 Macbook pro with quad-core processors includes a larger 58.0 watt-hour lithium-polymer battery. Apple claims 10 hours of battery life. Realistically, I see closer to 8 hours, which is good, but the Macbook Air 2015 still beats it! Also, because the battery is larger in the 2017 Macbook Pro without touchbar, expect better battery performance than the 2017 Macbook Pro with touchbar. Finally, when I close the lid, the laptop goes to sleep and the sleep low power mode will last for weeks.

Upgradeability
Nothing is upgradable! Get what you need when you need it!

Processor:
The 2.3 GHz dual-core Intel Core i5-7360U processor turbo boosts up to 3.6 GHz. The processor comes with 128MB of eDRAM. You have the opportunity to upgrade to a 2.5GHz dual-core Intel Core i7-7660U that can turbo boost up to 4.0 GHz. This upgrade will cost you $300. No thermal throttling in these dual-core 7th generation Core-i5 and Core-i7 processors.

  • Geekbench 4.3.1 Benchmarks:
    • Single-Core Score: 4488
    • Multi-Core Score: 9441
    • OpenCL Score: 31285

RAM:
At $1150, the 2017 Macbook Pro ships with 8GB of 2133MHz DDR3 RAM, the same amount of ram that ships with the $1800 2018 13 Inch Macbook Pro. You can pay Apple an extra $200 to upgrade to 16GB of RAM.

Gaming:
The Macbook Pro is NOT meant for gaming. That said though, let’s run some benchmarks and do it anyways. The integrated Intel Iris Plus Graphics 640 runs TombRaider just fine.

  • TombRaider Benchmarks at 720p Low Settings:
    • Min FPS: 23.6
    • Max FPS: 84.1
    • Average FPS: 67.4

Take these results with a grain of salt though. There was some serious stutter that increased as the computer increased in temperature. This caused the min FPS to drop considerably. I think it is a software issue, as this stutter did not exist on the Macbook Air. Result: Older games run very well. X360 and PS3 generation games run well on medium settings, and the latest generation of games will struggle at low setting. There are tricks to get any game to run on this hardware, but you’ll have to determine if tweaking a game for ultra-low settings is worth it for you. All this said, the fans do kick in during gaming. They aren’t loud, but they are present. Also, the battery life is reduced so find a charger. GeForce NOW Cloud Gaming for Mac and Steam In-home streaming are great alternatives if you really want to game on this Macbook.

2017 Macbook Pro vs 2018 Macbook Pro vs 2018 Macbook Air vs 2017 Macbook Air:
Let’s now compare the 2017 Macbook Pro 13 without Touchbar against the 2018 Macbook Pro 13, the 2017 Macbook Air, the 2017 Macbook, and 2018 Macbook Air. Right now, Apple has not released the 2018 13-inch Macbook Pro without a Touchbar. Therefore, you’ll have to pay a premium for the touchbar if you want the best performance. The single-core performance in all laptops is very similar, with the Macbook Pro 2018 inching above the rest. The 2018 Macbook Pro 13 blows away all other laptops with the multi-core performance, though. If you care about graphics, the 2017 Macbook Pro 13 seems to be the best value right now even though the 2018 Macbook Pro 13 inches above it. Although, if you really cared about gaming, you should get something with a discreet graphics card.

Conclusion:
If you are like me, and care for GPU performance over CPU performance (and don’t want to break the bank), then the 2017 Macbook Pro 13 is great. Just make sure to keep your keyboard clean to prevent issues and get ready for a slight learning curve to get used to the low-profile butterfly keys.

Continue Reading

Surface Pro 6 (Mid 2018)

Intro:
Back in 2013 and 2014, I used the Surface Pro 2 and Surface Pro 3 for a couple of months. Regrettably, due to weight, battery life, and thermal throttling, I sold them. Now I’m ready to try out Microsoft’s latest version, the Surface Pro 6.
Is the gold standard for tablet hybrids worth your money?

Configuration Options:
As an average Joe, who doesn’t like breaking the bank, I typically review the base model, the absolute cheapest model you can purchase that also has 8 GB of RAM. That said, though, as I was going to purchase the Surface, Microsoft’s website stated that the i7 is meant for gaming, so I upgraded. I also upgraded the RAM to 16GB and the storage to 512GB. These options increased the price from $900 to $1900. These prices do NOT include the keyboard and pen. My wife was not happy.

  • Display: 12.3-inch (2736×1824) PixelSense display, with 10-point touch
  • Processor: 8th Gen Quad-Core 1.6GHz Core i5 (8250U) or 1.9GHz i7 (8650U)
  • Graphics: Intel HD 620
  • Memory: 8-16GB DDR3 RAM
  • Storage: 128GB-1TB NVMe PCIe SSD
  • Processor: USB 3.0 Type-A, Surface Connect, miniDisplayPort, microSDXC card reader, 3.5mm headphone jack
  • Wireless: 802.11ac, Bluetooth 4.1
  • Cameras: 5MP/1080p (front) with Windows Hello; 8MP rear
  • Battery: 45Wh
  • Dimensions: 11.5 x 7.9 x 0.33 inches
  • Weight: 2.36 lbs (with type cover)
  • Colors: Platinum, black

My Price: $1899 for tablet, $159.99 for the keyboard (which is absolutely necessary!), $99 for the Surface Pen, and $34.99 for the Surface Mouse. Total: $2160 before tax.
Stick around to find out if I think these upgrades are worth it.

Ports:
The Surface Pro 6 has the same external design and port options as the Surface Pro 3, Surface Pro 4, and Surface Pro 5. I don’t think Microsoft wants to support Thunderbolt 3. As a result, there are no USB-C or thunderbolt 3 ports on the Surface Pro 6, even though the Surface Go and Surface Book do at least have USB-C.

  • The Surface Pro 6 includes:
    • USB 3 port with speeds up to 5 Gbps
    • Surface Connector
    • MiniDisplayPort
    • microSD card slot
    • 3.5mm headphone jack

It is a shame that I have to talk about the headphone jack like it is a plus.
No idea what the Surface Connector speed is, but Microsoft’s Surface Connect to USB-C adapter doesn’t include thunderbolt 3 speeds. Therefore, there isn’t an option right now for external GPUs. Let me know if you know what it’s speed is.

Sound:

  • Stereo speakers
  • Dual microphones
  • 3.5mm headphone jack

Display:
The 2736×1824 display has the same resolution as the 2017 model, but it is a little brighter. I should add that higher resolution displays work a lot better in Windows now. Back in 2014, the Surface Pro 3 did not scale Windows X86 apps very well. For example, Steam was a nightmare to use, especially when trying to use the Surface as a tablet. On the Surface Pro 7, to my pleasure, Steam scales perfectly. Using the Surfaces touch interface is much easier now when text is appropriately sized. The display supports Microsoft’s Surface Dial as well, but I didn’t test this.

Size and Weight:
The 11.5 x 7.9 x 0.33 inch dimensions and 2.36 lb weight allow the Surface pro to easily fit inside a bag with minimal strain on your back. Remember, all the weight is in the screen. A laptop with a 12.3 inch display is great for using on a desk as long as you are only using the touchscreen every now and then. A tablet with a 12.3 inch display is “ok” for using on a desk as your arms will fatigue trying to reach all parts of the screen. The surface is a nightmare when trying to consume media in bed. The only thing that worked was locking it in landscape and placing it on its side. It is too heavy to hold while I lie on my back.

Lapability:
How is it’s “lapability?” The keyboard does stay attached to the Surface while in my lap to an extent. The kickstand will become uncomfortable after long periods of use. These are the same issues I had with the Surface Pro 3. Some things Microsoft fixed, though, are battery life and thermal throttling.

Battery Life:
Battery life averaged eight hours rather than Microsoft’s advertised 13.5 hours. This is way better than the Surface Pro 3’s six hours (and advertised nine). Still, the battery will last you through the entire day of work and school.

Processor:
The Surface Pro 6 includes Intel’s 8th Gen Quad-Core Core i5 or i7 processors. All previous models were only Dual-Core. As a result, there is a significant boost in Multi-Core performance.

  • Microsoft’s descriptions for these processors:
    • Intel Core i5: Perfect for photographs, videos, reports, and presentations. Compatible with Surface Dial (off-screen interactions). Choose from two memory and storage configurations
    • Intel Core i7: The Intel Core i7 option includes Intel UHD graphics, making your photo, video, and 3D applications run faster. It also gives you the ability to play more PC games. Compatible with Surface Dial.
  • Geekbench 4.2.3 Benchmarks:
    • Single-Core Score: 4429
    • Multi-Core Score: 13833
    • OpenCL Score: 36842

I didn’t get any thermal throttling. For the Surface Pro 3, 10 Chrome tabs would start the fans. This doesn’t happen on the Surface Pro 6. It does get warm when charging, though, which could hurt your performance.

Upgradeability:
Nothing is upgradeable. Get what you need when you need it.

RAM:
As I said before, in my opinion, do not buy a computer today with anything less than 8GB of RAM. Luckily, the base model ships with 8GB or RAM for $900. Regrettably, if you upgrade the RAM to 16GB, Microsoft forces you to also upgrade the processor and storage to the Core i7 and 512GB increasing the $900 price to $1900. I know you are getting more performance with the Core i7 and more storage is also useful, but it would be nice to have the option to upgrade the RAM without having to upgrade the Processor and Storage as well.

Gaming:
Microsoft states that the Surface Pro 6’s Intel Core i7 option gives “you the ability to play more PC games.” Let’s find out.

  • TombRaider Benchmarks at 720p Low Settings
    • Min FPS: 48.0
    • Max FPS: 102.0
    • Average FPS: 79.7

As a result, older games run very well. X360 and PS3 generation games run well on medium settings, and the latest generation of games can play at low settings very well. GeForce NOW Cloud Gaming and Steam In-home streaming are great alternatives if you really want to game.

Type Cover:
The Type Covers weren’t updated this year. Therefore, you can purchase the older Type Cover on Amazon or the Signature Type Cover on Amazon or Microsoft. These type covers are interchangeable. The Type Cover and Signature Type Cover are exactly the same mechanically. The only difference is the Alcantara or suede fabric on the Signature version. The Signature Keyboard used to cost an extra $30, but Amazon has both keyboards similarly priced now. Why did I choose the Type Cover over the Signature Type Cover? My wife likes red and not Burgundy. Key travel is 1.0mm, almost double the key travel in the current gen Macbook Pros. As a result, typing on this keyboard is very comfortable. That said, you will find it difficult to type quietly when the cover is slanted. You might bother your classmates or coworkers. There exists no fingerprint sensor on this version, though. The keys are backlit with the ability to adjust key brightness. Figuring out how to adjust screen brightness was a chore. It’s not marked like the keyboard brightness. I thought I had a malfunctioning keyboard, but no. FN+DEL and FN+Backspace adjust the screen brightness.

Precision trackpad:
This trackpad has some of the best tracking on Windows. That said, it is a little small for my tastes. Does it pass my finger-roll test? Kind of. It senses the movement, but it’s not as sensitive as an Apple Trackpad.

Surface Pen:
The Surface Pen was not upgraded this year. With 4,096 levels of pressure, it is more sensitive than the previous pen. That is why I got the 2017 burgundy pen. My wife likes it. She says it’s fun to draw and doodle with. As far as using the pen for note taking, she and I both don’t recommend it. For us, we are fast typists; I also found out that I am faster at using swipe gestures to type on the on-screen keyboard than I am writing with the stylus. Both of our notes were barely legible as well.

Surface Pro 2017 vs Surface Pro 6 2018:
The Surface Pro (2017) and the Surface Pro 6 (2018) are physically identical from a chassis standpoint. The major differences are internal. The new 8th Gen Quad-Core processors give a substantial improvement in Multi-Core performance over last year’s Dual-Core Processors. Last year’s Intel Core i7-7660U scored 4568 Since-Core and 9209 Multi-Core Improvements. Equivalent single-core scores. 50% improvement multi-core performance! Last year’s Intel Iris Plus Graphics 640 scored OpenCL of 31278. This years UHD 620 scored OpenCL of 36842. This is an 18% Improvement. The other difference: It comes in black.

Conclusion:
Should you get the Surface Pro 6? If you like large 2-in-1’s, then this is the gold standard. It’s battery life, performance, keyboard, and trackpad are all great, but it’s ports selection, lapability, and upgradeability are things you should consider before purchase.

Continue Reading

Apple’s Blackmagic eGPU – Worth $699?

Intro:
Apple just started selling the super quiet Blackmagic eGPU, a thunderbolt 3 external GPU designed with Mac OS in mind. This is the first time Apple has sold an eGPU directly in the Apple Store. Is it worth the $700 asking price? Let’s find out!

Specifications:
The eGPU comes with a Radeon Pro 580 with 8GB of GDDR5 memory, Thunderbolt 3 passthrough, 4X USB 3 ports, 1X HDMI 2.0 port, and 85W of power delivery. Apple will charge you $699 before tax:
https://www.apple.com/shop/product/HM8Y2VC/A/blackmagic-egpu

Build Quality:
Apple is going for a seamless plug-and-play design. As soon as you plug it in, the Macbook will recognize what it is, and boost graphics. That said, though, gaming graphics are boosted only on the external display plugged into the Macbook. Tweaks exist to improve gaming graphics performance on the internal display, but that takes away from the seamlessness. The same thing occurs with programs. You have to change certain settings in the GPU intensive program to take advantage of the eGPU. If the program doesn’t have this option, you’ll again have to find a work-around online. Regardless, before you unplug your laptop from the eGPU, you’ll have to press a specific Eject button in your Mac’s menu bar. All this takes away from the seamless and simplicity factor that Apple is going for.

The eGPU stays quiet during load, but it comes at a price. A large internal fan and heatsink causes the overall dimensions to be approximately one foot in height and half a foot in length and width. The weight is 10 pounds. This creates a large metal box.

The eGPU ships with a 1.6 foot (0.5 meter) thunderbolt 3 cable. This short cable forces you to keep the large eGPU on your desk a foot away from your laptop. For a $700 device, I’d like the option to place the eGPU wherever I like.
Even though the eGPU is sculpted for aesthetics, it’s short Thunderbolt 3 cable length and large size will take away from your workspace.

Thunderbolt 3 Hub:
The addition of four USB 3 Type A ports is a really nice addition. It turns the eGPU into a thunderbolt 3 dock. Apple sells a $350 Belkin Thunderbolt 3 Dock, but the funny thing is that the Belkin dock ships with a thunderbolt 3 cable at twice the length at 3.3 feet (1.0 meter).

https://www.apple.com/shop/product/HKQ12VC/A/belkin-thunderbolt-3-express-dock-hd

One of the Thunderbolt 3 ports can charge your Macbook up to 85W. The extra Thunderbolt 3 port allows for Thunderbolt 3 passthrough. If you wanted to, you could daisy-chain another Thunderbolt 3 Hub to this eGPU, but most reviewers are excited that Apple’s LG 5K UltraFine display can be plugged into the eGPU. I personally don’t have that display. I actually use 30-inch Cinema Displays that connect via older DVI-D Dual-Link connections. Most GPUs today still have this port, but not the Blackmagic eGPU. Either you use a Thunderbolt 3 display, or you use an HDMI monitor using the HDMI 2.0 port.

Performance Boost and Gaming:
Macbooks are NOT meant for gaming, but this eGPU really helps them step up their game. The 2018 13-inch Macbook Pro’s integrated Intel Iris Plus Graphics 655 performance is boosted as shown below:

  • TombRaider Benchmarks at 720p Low Settings with internal graphics:
    • Min FPS: 21.2
    • Max FPS: 89.9
    • Average FPS: 62.3
  • TombRaider Benchmarks at 720p Low Settings with Blackmagic eGPU and RX 580:
    • Min FPS: 59.1
    • Max FPS: 138.3
    • Average FPS: 112.2

The average FPS is significantly improved 80% with the Blackmagic eGPU!

The 2018 13-inch Macbook Pro’s Geekbench scores are improved as well:

    • Geekbench 4.2.3 OpenCL GPU Score with Internal Graphics: 33606
    • Geekbench 4.2.3 OpenCL GPU Score with Blackmagic eGPU with RX 580: 113046

This is over three times the theoretical GPU performance!

Using with Thunderbolt 2 Devices like the Macbook Air:
If you’ve read my 2015 Macbook Air review, you’ll know that I love that laptop. It is one of the best-value laptops Apple sells. Is the Blackmagic eGPU backwards compatible with Thunderbolt 2 devices like the Macbook Air? Sadly, Apple removed eGPU support for Thunderbolt 1 and 2 devices in a recent update, but a script developed by PurgeWrangler re-enables this functionality. All you need to do is run the script and purchase a thunderbolt 3 to thunderbolt 2 adapter.

https://www.amazon.com/Apple-MMEL2AM-Thunderbolt-Usb-C-Adapter

The 2015 13-inch Macbook Air’s integrated Intel HD Graphics 6000 performance is boosted as shown below:

  • TombRaider Benchmarks at 720p Low Settings with internal graphics:
    • Min FPS: 16.7
    • Max FPS: 47.8
    • Average FPS: 36.7
  • TombRaider Benchmarks at 720p Low Settings with Blackmagic eGPU and RX 580:
    • Min FPS: 27.9
    • Max FPS: 86.6
    • Average FPS: 68.5

The average FPS is significantly improved 87% with the Blackmagic eGPU! The FPS won’t be as good as anything with a Thunderbolt 3 port, but the improvement is still significant over the Macbook Air’s integrated graphics. The downside is that you have to use an external monitor to take advantage of these benefits.

The 2018 13-inch Macbook Pro’s Geekbench scores are improved as well:

    • Geekbench 4.2.3 OpenCL GPU Score with Internal Graphics: 18404
    • Geekbench 4.2.3 OpenCL GPU Score with Blackmagic eGPU with RX 580: 106443

This is over four times the theoretical GPU performance!

Upgradeability
Sadly, there is no ability to upgrade just like mostly everything else Apple has been selling the past few years. That means that instead of spending $100 to $300 for a new graphics card a few years down the road, you’ll have to spend another $700 for a new all-in-one eGPU, if Apple decides to sell another one. Most other eGPUs on the market allow the capability to upgrade.

Conclusion:
The Blackmagic eGPU is a quiet, relatively simple to use device that will show significant boosts in performance in Macbooks that don’t already have discreet graphics, but its $700 price tag, lack of more ports, and zero-upgradability makes it not worth the money to me.

Continue Reading

Macbook Pro (13-inch, Mid 2018) – Worth $1799?

Intro:
Apple just released the 2018 Macbook Pro 13 and 15 inch variants. I decided to give the base 13-inch model, the 2.3 GHz Core i5 version with 8 GB of RAM a try. Is it worth $1800?

Configuration Options:
As an average Joe, who doesn’t want to break the bank, I am reviewing the base model, the absolute cheapest model you can purchase. The problem is that this base model right now includes the touchbar and causes the price to jump to $1799. This configuration comes with four Thunderbolt 3 ports, a 2.3 GHz Intel Core i5, 8 GB 2133 MHz LPDDR3 RAM, integrated Intel Iris Plus Graphics 655. I’m glad that the base model comes with 8GB of RAM, but in 2018, I think 8GB is the lowest amount of RAM that is acceptable for an average computer. Apple’s own regular Macbook ships with 8GB as the minimum amount of RAM. Shouldn’t the Pro version ship with a minimum of 16 GB? For this base model, you’ll still be paying $1800 before tax:
https://www.apple.com/shop/buy-mac/macbook-pro/13-inch-space-gray-256gb-2.3ghz-quad-core#
If you upgrade to 512 GB of SSD storage, you’ll be paying $200 extra. I don’t recommend this. Although much slower, I’d recommend just getting a 2TB external drive on amazon for only $65:
https://www.amazon.com/Elements-Portable-External-Drive
Other options include a 2.7GHz quad-core Intel Core i7 for $300 more and a 16GB of RAM version for $200 more.

Keyboard:
If you’ve seen my Macbook Air 2015 review, you know I love the 2015 and 2017 Macbook Air keyboards. The travel on those keys are near perfect. For the 2018 Macbook pro, the keys are way too shallow for my preference. Apple will hope that we consumers will get used to the keys, but it’s been three years, and people are still complaining about the shallow keys. This keyboard includes Apple’s 3rd generation butterfly mechanism. Apple says these keys are quieter that previous butterfly keys, but they are still louder than the keys on my Macbook Air. The key travel on this Macbook Pro is only 0.8mm of travel, where they Macbook air has a much more comfortable 1.4mm of travel. Apple, if you’re listening, I am more than happy to increase the thickness of my laptop by 0.6mm to improve the keyboard ergonomics. Also, there have been many reports that these newer butterfly keys break often and stop working when a piece of dust gets lodged under the key. Apple doesn’t claim to fix this problem with the 3rd generation scissor keys, so only time will tell if the problem continues to happen. Finally, the keys are backlit with the ability to adjust the brightness. They also include an ambient light sensor.

Glass trackpad:
This trackpad is just as nice as all Apple’s trackpads. It is no better or no worse than the 2015 Macbook Air. Apple has nailed the simulated click; you can’t feel a difference in the physical click except that you can click anywhere on the trackpad now just as easily as you can click the bottom. It is way better than any Windows or Chrome OS computer. The glass feels very nice under my fingers. It does have force touch, but even in 2018, this feels like a gimmick.

Touchbar:
The touchbar is more of a gimmicky nuisance than a functional tool. Rather than my muscle memory telling me exactly where certain key functions are, the functions keep changing, I have to break my workflow, look down, and press the touchbar. The best part about the touchbar is the TouchID fingerprint sensor, but I’m still trying to get used to it. Apple forced me to separate my login and mac password from my Apple ID password; therefore, my mac still asks me for a password sometimes and a fingerprint other times.

Ports:
The 2018 13-inch Macbook Pro comes with four Thunderbolt 3 ports, all of which are full speed (40 Gb/s); previous versions throttled two of the ports’ speed. Other than the Thunderbolt 3 ports, the only other port is the 3.5mm headphone jack. That’s it! No USB type A ports, no SD Card slot. Please comment! Are these ports something YOU would want in your laptop? Or would you like to pay Apple $50 for an adapter? In my experience, as a pro user, for my Pro laptop, I want a computer that has the ports to do Pro things without me having to buy adapters. I tool that isn’t capable of doing certain things without an adapter feels less like a tool to me.

Sound:
This laptop includes typical laptop speakers. There is no distortion at high volumes. They are stereo speakers.

Size and Weight:
The screen is 13.3 inches diagonally. The screen uses Apples 16:10 aspect ratio, which in truth, is great for scrolling through webpages as you can see more from the top to the bottom. As far as weight, I can hold this laptop with one hand with no problems. The 3.02 Lb and 0.59″ thick laptop easily fits inside a bag. It is just a hair heavier than the macbook air. All this said, the size of the laptop is large enough to multitask, but small and light enough to be very portable.

Display:
The screen inside the macbook is a gorgeous 13.3-inch (diagonal) LED-backlit display with IPS technology. The resolution is 2560×1600 or 227 pixels per inch.

Battery Life:
The laptop includes a built-in 58.0 watt-hour lithium-polymer battery. Apple claims 10 hours of battery life. Realistically, I see closer to 8 hours, which is good, but the Macbook Air 2015 still beats it! Also, when I close the lid, the laptop goes to sleep and the sleep low power mode will last for weeks.

Upgradeability
Nothing is upgradeable in this laptop. This doesn’t seem very “pro” to me.

Processor:
The 2.3 GHz quad-core Intel Core i5-8259U processor turbo boosts up to 3.8 GHz. The processor comes with 128MB of eDRAM. You have the opportunity to upgrade to a 2.7GHz quad-core Intel Core i7-8559U that can turbo boost up to 4.5 GHz. This upgrade will cost you $300 and is not recommended. No thermal throttling in the 13-inch Core-i5.

  • Geekbench 4.2.3 Benchmarks:
    • Single-Core Score: 4553
    • Multi-Core Score: 16817
    • OpenCL Score: 133606

RAM:
At $1800, the macbook pro ships with 8GB of 2133MHz LPDDR3 RAM. You can pay Apple an additional $200 to upgrade to 16GB of RAM. As I said before, 8GB is the bare minimum of RAM I recommend in 2018. It doesn’t seem very Pro-like for an $1800 Pro Laptop to ship with the bare minimum.

Gaming:
The Macbook Pro is NOT meant for gaming. That said though, let’s run some benchmarks and do it anyways. The integrated Intel Iris Plus Graphics 655 runs TombRaider just fine.

  • TombRaider Benchmarks at 720p Low Settings:
    • Min FPS: 21.2
    • Max FPS: 89.9
    • Average FPS: 62.3

Take these results with a grain of salt though. There was some serious stutter, which caused the min FPS to drop considerably. I think it is a software issue, as this stutter did not exist on the Macbook Air.The fans do kick in during gaming. They aren’t loud, but they are present. GeForce NOW Cloud Gaming for Mac and Steam In-home streaming are great alternatives if you really want to game on this Macbook.

Macbook Air (13-inch Mid-2017) VS Macbook Pro (13-inch Mid-2018):
The bump in performance between the 2015/2017 Macbook Air and the 2018 Macbook Pro is significant, but is it worth the cost?

As you can see, it is twice as valuable to get the Macbook Air 2015 or 2017 than it is to get the 2018 Macbook Pro.
I like the Mac ecosystem, because I think sending text messages and calling people from my laptop is a very useful tool. That said, though, paying a very high premium for performance is not worth it for me. For the average Joe, I recommend sticking with the 2017 Macbook Air. Maybe Apple will release the 2018 13-inch Macbook Pro without Touchbar soon. That should be a significantly better value.

Macbook Pro (13-inch Mid-2017) VS Macbook Pro (13-inch Mid-2018):
The bump in performance between the 2017 Macbook Pro and the 2018 Macbook Pro is also significant. Is it worth the cost this time?

It is still a 47% better deal to get the 2017 Macbook Pro over the 2018 Macbook Pro. Again, a 2018 Macbook Pro without touchbar would be a much better value.

Mac OS:
If you’ve stayed this long, you might be wondering if I am a Mac fanboy. Mac OS is Mac OS. It has it’s positives and its negatives. It works well on apple hardware and is one of the reasons why this laptop has such great battery life. On the other hand, gaming in Mac OS is a challenge. We can review the operating system in more depth in a different review, but I see computers and operating systems as tools. I use everything.

Conclusion:
For me, the 2018 13-inch Macbook Pro’s performance boost is not worth the additional cost. Apple makes some great laptops. I recommend getting a previous generation Macbook Air or Macbook Pro. To me, if you don’t need the fastest performer that runs Mac OS, these have a better value.

Continue Reading

Macbook Air (13-inch, Early 2015) – Worth it in 2018?

Intro:
I recently moved across the country and initially only brought my early 2015 13-inch Macbook Air with me. Since I left my Windows gaming pc and media server back with my fiancé, I got to spend a few weeks working solely on the Macbook Air, and this is what I realized. I love this machine! Therefore, I thought I might make a review of it. I wanted to share my thoughts and opinions on the 2015 13-inch Macbook Air, and create a Mid 2018 Review. What if the Macbook Air, the inspiration for all ultrabooks, was released today after so many Ultrabooks and ultralights have already saturated the market. I am going to discuss both it’s hardware and software components starting with the Keyboard.

Configuration Options:
As an average Joe, who doesn’t want to break the bank, I am reviewing the base model, the absolute cheapest model you can purchase that also has 8GB of RAM. My configuration: 1.6 GHz Intel Core i5-5250U dual-core, automatic overclock capability to 2.7 GHz on demand through Intel Turbo Boost technology. Currently, you can buy the 8GB 2017 version refurbished at Apple.com with 128GB of SSD storage for $849. If you upgrade to 256GB of SSD storage, you’ll be paying $179 extra. Other options include a Core i7 for $150 extra. I don’t recommend either of these upgrades, and I’ll get into why later in the review.

Keyboard:
I love this keyboard. It feels way better than this generation’s new Macbook and Macbook Pros. It uses the better, and yes, I mean better Apple keyboard where each key has 1.4mm of travel before registering a click. The newer Macbook Pro keyboards with the new butterfly keys have almost HALF that travel at 0.8mm. There have been many reports that these newer butterfly keys break often and stop working when a piece of dust gets lodged under the key. I’m sure there are many who will agree with me that this older keyboard not only feels better to type on, preventing carpel tunnel, but that they are also quieter as well. Therefore, not only are you are happier when you’re typing, but your significant other sitting next to you on the couch will also appreciate you more as well. Classmates will thank you too. Finally, the keys are backlit with the ability to adjust the brightness. They also include an ambient light sensor.

Glass trackpad:
This trackpad is like no other trackpad I’ve used on a Windows or Chrome OS computer. The glass feels smooth under my fingers. It is a mixture of software and hardware too. Although Microsoft eventually upped their game with the Windows Precision Drivers, the sensitivity in a mac trackpad is like the sensitivity of using the glass touchscreen on your smartphone. I can roll the tip of my finger on the trackpad and the curser on the screen will move exactly the distance I want it to. Next time you’re in a computer store, I highly recommend that you test a few laptops with the “trackpad fingertip roll test. All this said, if you try and install Windows or a Linux distribution through Bootcamp, you lose this functionality. It isn’t the Force Touch Trackpad where users have the ability to hard press anywhere on the glass to generate a simulated “physical click.” The click is real in this trackpad, but you have to click close to the bottom; tapping to click does work anywhere on the trackpad, though. For me, I click only by tapping the trackpad just like I do on my smartphone screen, so I have no issues.
Also, this trackpad doesn’t have Apple’s new Force Touch – force click feature. I tried this on the Macbook Retina, and it seemed poorly implemented and gimmicky for me at the time. Maybe Apple has improved it over time.

Ports:
Although not as fast, the port selection is significantly better than what is currently offered in Apple’s latest, more expensive laptop line.

The 13-inch Macbook Air includes:

  • Two USB 3 ports with speeds up to 5 Gbps
  • Thunderbolt 2 port with speeds up to 20 Gbps
  • Magsave 2 power port
  • SDXC card slot
  • 3.5mm headphone jack

It is a shame that I have to talk about the headphone jack like it is a plus.

Sound:
This laptop includes typical laptop speakers. There is no distortion at high volumes. They are stereo speakers.

Size and Weight:
The screen is 13 inches diagonally. The screen uses Apples 16:10 aspect ratio, which in truth, is great for scrolling through webpages as you can see more from the top to the bottom. As far as weight, I can hold this laptop with one hand with no problems. The 2.9 lb laptop easily fits inside a bag. It is 0.68inches at its widest point, but it tapers to just 0.11″, which revolutionized laptops back in 2008, but is now sub-par compared to other ultra books. All this said, the size of the laptop is large enough to multitask, but small and light enough to be very portable.

Display:
I remember a few years ago that reviewers were saying that the TN panel (yes, it is a TN panel, not an IPS display), was one of the best TN panels in a laptop. Yes, the resolution isn’t as high and the text is slightly blurrier than laptops of this generation, and it’s good to know that apple has done a really great job at making higher resolution displays work well with their OS (looking at you, Microsoft and windows software developers. Fix your UIs!) Is this screen retina quality? No, but am I putting my retina 3 inches away from my screen like I do with my smartphone? No. Therefore, the higher resolution isn’t as apparent as it was for smartphones. Can you tell a difference? Yes, but is it worth the cost? No, and here’s why. Battery Life!!!

Battery Life:
Let me just say, WOW! I remember when the 2014 model was released with Haswell processors. The battery life expectancy blew everyone’s mind. Apple claims 12 hours of battery life. Realistically, I see closer to 10 hours, which is still better than any other laptop, windows or mac. I’ve been writing this blog post for the past hour on the macbook air, and the battery is still at 100% capacity. Also, when I close the lid, the laptop goes to sleep and it will last for weeks in this mode. I’ll pick my laptop up a month later, open it up, and it will instantly turn on and prompt me for my password.

Upgradeability
Unlike Apple’s most recent models, you can still open the macbook air and replace the SSD and the battery, but there is a cost. The problem is that Apple uses a proprietary SSD. Other manufacturers make the SSD, but they are costly. Transcend Jetdrive 820 is a good SSD for $199 for a 240GB SSD, $330 for a 480GB SSD, and $599 for a 960SSD. You can purchase Transcend Jetdrive 820 in the link below:
https://www.amazon.com/Transcend-240GB-JetDrive

Batteries are a better deal. You can get a new battery for $49.99 on Amazon right now:
https://www.amazon.com/HUSAN-Laptop-Battery-MacBook-Version/
Therefore, you can make any used macbook air like new again by simply upgrading the SSD and battery… all except the processor.

Processor:
The i5 processor in the macbook air is still very decent in 2018. I think that since the performance growth in processors hasn’t been very fast in the past few years (with the recent exception of 13 inch laptops finally getting quad-core processors), that using a computer with an older generation processor (as long as it’s later than Haswell) isn’t going to prevent you from doing what you need to do.

  • Geekbench 4.2.3 Benchmarks:
    • Single-Core Score: 3320
    • Multi-Core Score: 5918
    • OpenCL Score: 18404

RAM:
As I said before, in my opinion, do not buy a computer today with anything less than 8GB of RAM.

Gaming:
The Macbook Air is NOT meant for gaming. That said though, let’s run some benchmarks and do it anyways. The integrated Intel HD Graphics 6000 with 1536 MB of dedicated memory runs TombRaider just fine.

  • TombRaider Benchmarks at 720p Low Settings:
    • Min FPS: 16.7
    • Max FPS: 47.8
    • Average FPS: 36.7

The fans do kick in during gaming. They aren’t loud, but they are present. GeForce NOW Cloud Gaming for Mac and Steam In-home streaming are great alternatives if you really want to game on this Macbook.

2015 vs 2017:
Why get the 2015 model over the 2017 model? The Macbook Air 13-inch versions are physically identical from a chassis standpoint. The 1.6 GHz to 1.8 GBz processor bump shows an approximate 10%-13% better performance in Geekbench 4 benchmark results. The same processor is being used, but it’s just at a slightly higher clock-rate. This is not a significant enough performance boost for me, so there is no need to upgrade, but if you can find the 2017 model for a good deal, go for it.

Mac OS:
If you’ve stayed this long, you might be wondering if I am a Mac fanboy. Mac OS is Mac OS. It has it’s positives and its negatives. It works well on apple hardware and is one of the reasons why this laptop has such great battery life. On the other hand, gaming in Mac OS is a challenge. We can review the operating system in more depth in a different review, but I see computers and operating systems as tools. I use everything.

Conclusion:
I highly recommend the 2015 and 2017 Macbook Airs. I’ve upgraded to both the Macbook and Macbook Pros, but went back to using my Macbook Air both times. If you can get past the dated display, the long-lasting battery-life, supurb keyboard and trackpad, and sturdy but light construction makes this the best laptop I’ve ever used!

Continue Reading